Introduction
I’ve been wanting to build my own home lab for a long time, but kept putting it off. Over time, I accumulated enough reasons to finally get started:
- I’m unable to run x86_64 applications on my Mac (ARM architecture) and needed an environment for testing and development
- Desire to experiment with self-hosted services (Paperless-NGX, Monica, n8n) and virtualized network labs (GNS3, EVE-NG)
- Control over my own data and backups on my own hardware instead of cloud subscriptions
- DevOps practice: deploying and managing infrastructure (GitLab, K8s, monitoring)
Project goals:
- Build infrastructure for personal services accessible via VPN/internet
- Gain practical experience in infrastructure planning, automation, and security
- Do it on a budget, getting maximum value for money
Since this is a hobby project and not a production environment, I chose the simplest way to start - a mini PC with Proxmox. Compact, powerful, and cost-effective option for running multiple VMs.
Hardware Hunt in Serbia
The most suitable hardware for my needs are mini computers designed for corporate workstations. They’re compact, reliable, and often have sufficiently powerful processors with plenty of RAM. And if you buy from the second-hand market, which has plenty of these devices in Serbia, it becomes quite budget-friendly.
I searched on the most popular classifieds site in Serbia - https://kupujemprodajem.com. I didn’t consider official electronics retail chains as they offer a very limited selection and only the latest models of mini computers, making the price unjustifiably high. eBay and other European auctions don’t make sense due to import duties (I would pay at least 20% extra).
These are the model lines I was interested in:
- Lenovo ThinkCentre Tiny
- Dell OptiPlex Micro
- HP Elitedesk/Prodesk Mini
My budget for this PC was 250 euros. The biggest selection of suitable options was among Lenovo. Here’s what I found:
| Model | CPU | RAM | Price | Comment |
|---|---|---|---|---|
| M720q | i5-8500T | 8GB | €180 | Good price, but not enough RAM for my needs |
| M920q | i7-8700T | 16GB | €250 | Chose this one - best value |
| M910q | i7-7700T | 16GB | €240 | Older generation CPU, slightly weaker |
| HP EliteDesk 800 G4 | i5-8500 | 16GB | €280 | More expensive without advantages |
In the end, I got Lenovo ThinkCentre M920q with i7-8700T, 16GB RAM and 256GB NVMe SSD for 250 euros. The seller turned out to be a service selling dozens of such used PCs. I also bought an additional 16GB stick of RAM there for 30 euros.
Total: 280 euros for hardware.
Technical Specifications
Here’s what I got for my money:
Full system description (spoiler)
Basic Information
Processor
Memory
Storage
Special Features
Photos

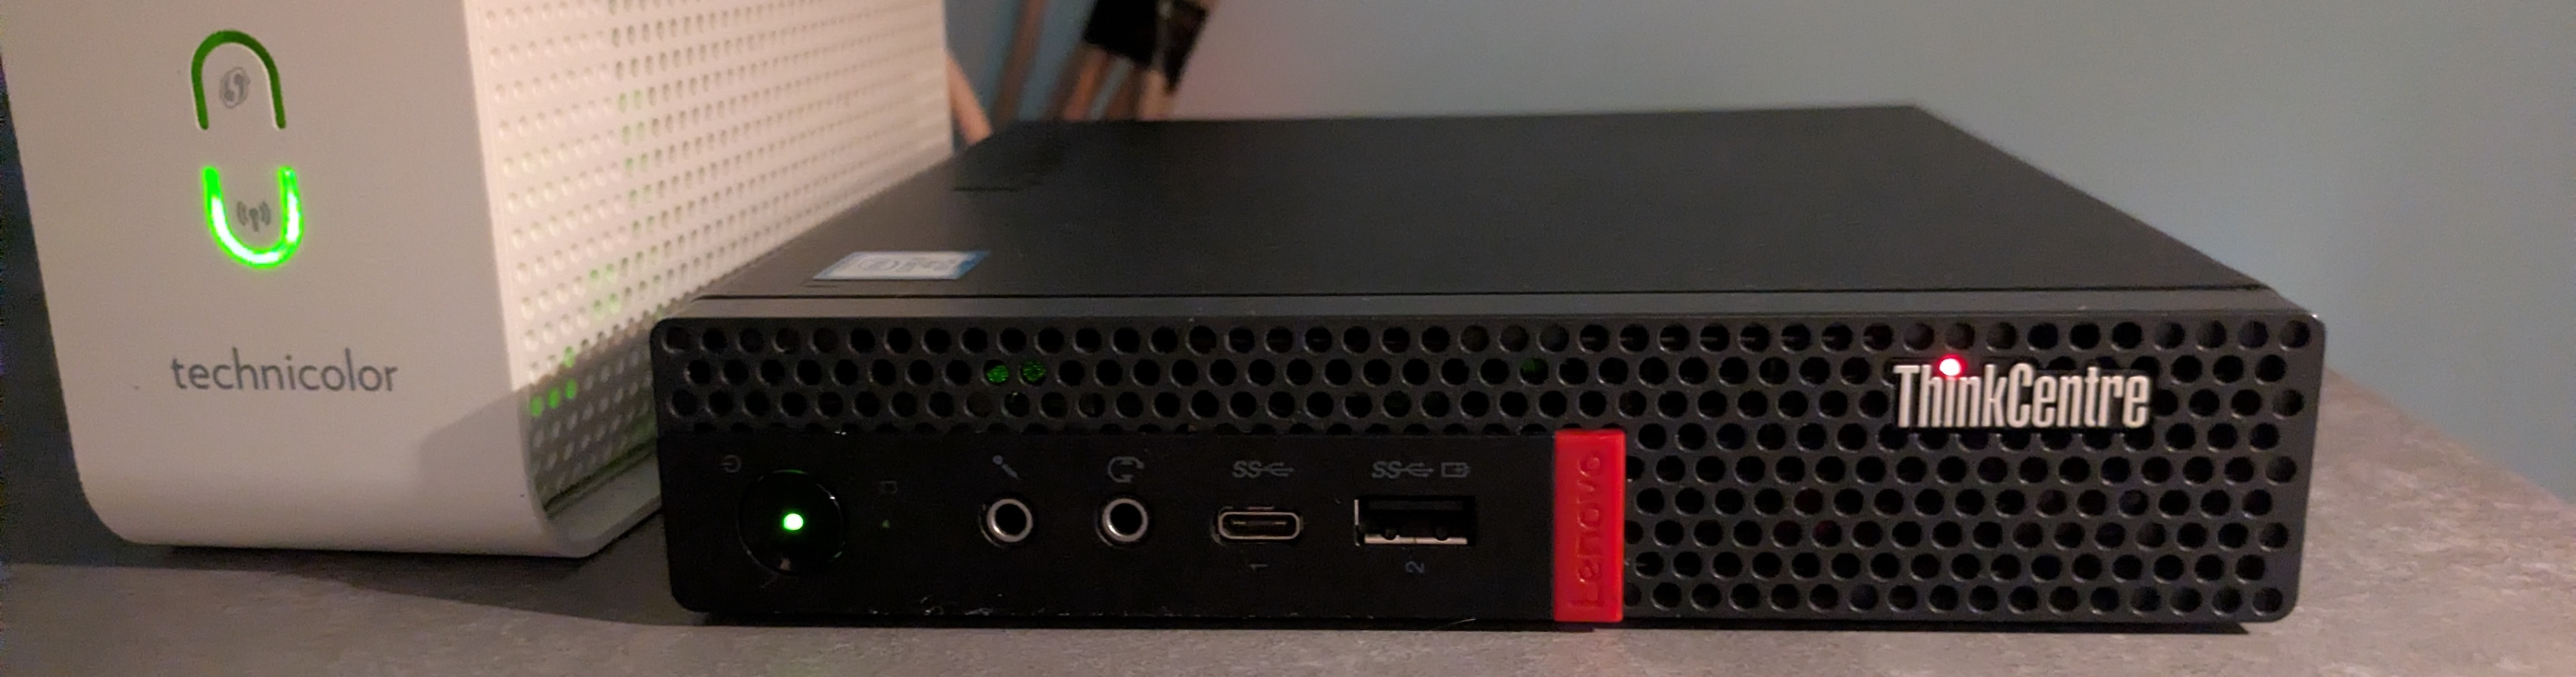
My current setup

Power button, headphone and microphone jacks, Thunderbolt 3, USB ports. A small built-in speaker is located behind the front panel
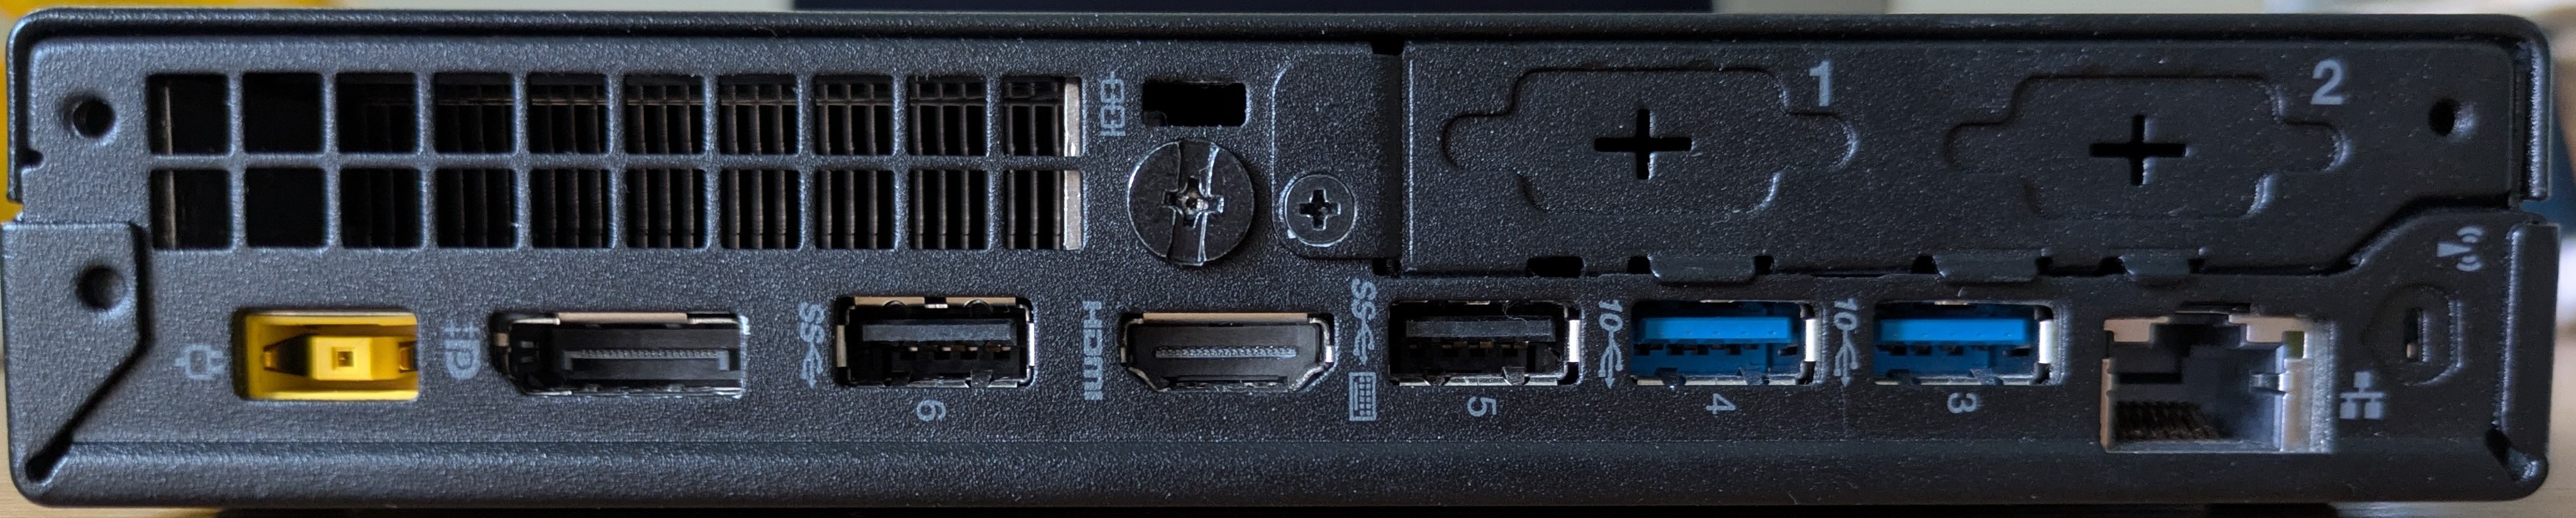
All necessary ports: DisplayPort, USB, HDMI, Ethernet

Inside: SATA tray for connecting an additional disk

Two SODIMM slots, M.2 slot

Size comparison with MX Master 3S mouse
Power Consumption and Noise
For a server running 24/7, power consumption and noise level are important. The i7-8700T has a TDP of only 35W, making it very efficient:
- Idle: ~10-15W - at minimal load the system barely consumes energy
- Average load: ~20-25W
- Maximum load: up to 35W - when all cores are fully loaded
Noise level: Practically silent. In idle mode the fan is barely audible (runs at minimum RPM). Under load you can hear a quiet hum, but it doesn’t bother you even if the computer is in a living room. Much quieter than a regular desktop PC or gaming laptop.
Temperatures: At idle the CPU stays at 40-50°C, under load 70-80°C. The cooling system handles it excellently, no throttling observed.
Installing Proxmox VE
What is Proxmox and why choose it?
Since I want to run virtual machines, I need a hypervisor. I chose Proxmox VE (Virtual Environment), an open virtualization platform based on Debian Linux that allows managing virtual machines and containers through a convenient web interface.
For a home lab, Proxmox is the ideal choice, in my opinion. It’s free and open source. Unlike VMware ESXi, which is either paid or severely limited in the free version, Proxmox gives you all features right away. The paid subscription is only needed if you want enterprise support, but for home use it’s not necessary.
Proxmox has everything you need out of the box: backups, snapshots, resource monitoring. You can start with one server, then later add more and combine them into a cluster.
VM vs LXC: What’s the difference and which to choose?
Proxmox has two ways to run something:
Virtual Machines (VM) — The classic option. This is essentially a full computer emulation. Isolation here is maximum - each VM is a separate isolated world. But there’s a tradeoff: VMs consume more RAM and CPU, take longer to boot, and generally have overhead from virtualizing hardware.
LXC containers work completely differently. This is a container that uses the host operating system’s kernel, i.e. Proxmox, but isolates processes, network, and file system. Essentially, it’s like a separate Linux system that starts in seconds and uses megabytes of memory instead of gigabytes. Performance is almost like a native system. The downside is that you can only run Linux and isolation from the host is incomplete.
Installation Process
Installing Proxmox is fairly simple, but there are a few important considerations. Full official guide: https://www.proxmox.com/en/products/proxmox-virtual-environment/get-started
Basic steps:
- Download ISO image from the official website
- Write to USB flash drive (Balena Etcher for macOS, Rufus for Windows)
- Boot from flash drive (F12 for Boot menu on Lenovo)
- Choose graphical installation
Important points during installation:
- Disk: Proxmox will install on the entire selected disk, erasing all data
- Network: It’s better to set up a static IP address instead of DHCP - this makes it easier to connect to the web interface
- Hostname: Set a clear name (e.g.,
homelab-01.local) - Root password: Use a strong password - this will be the main access to the entire system
After installation, Proxmox is available through the web interface at https://<proxmox_ip>:8006/. Login: root, password is what you set during installation.
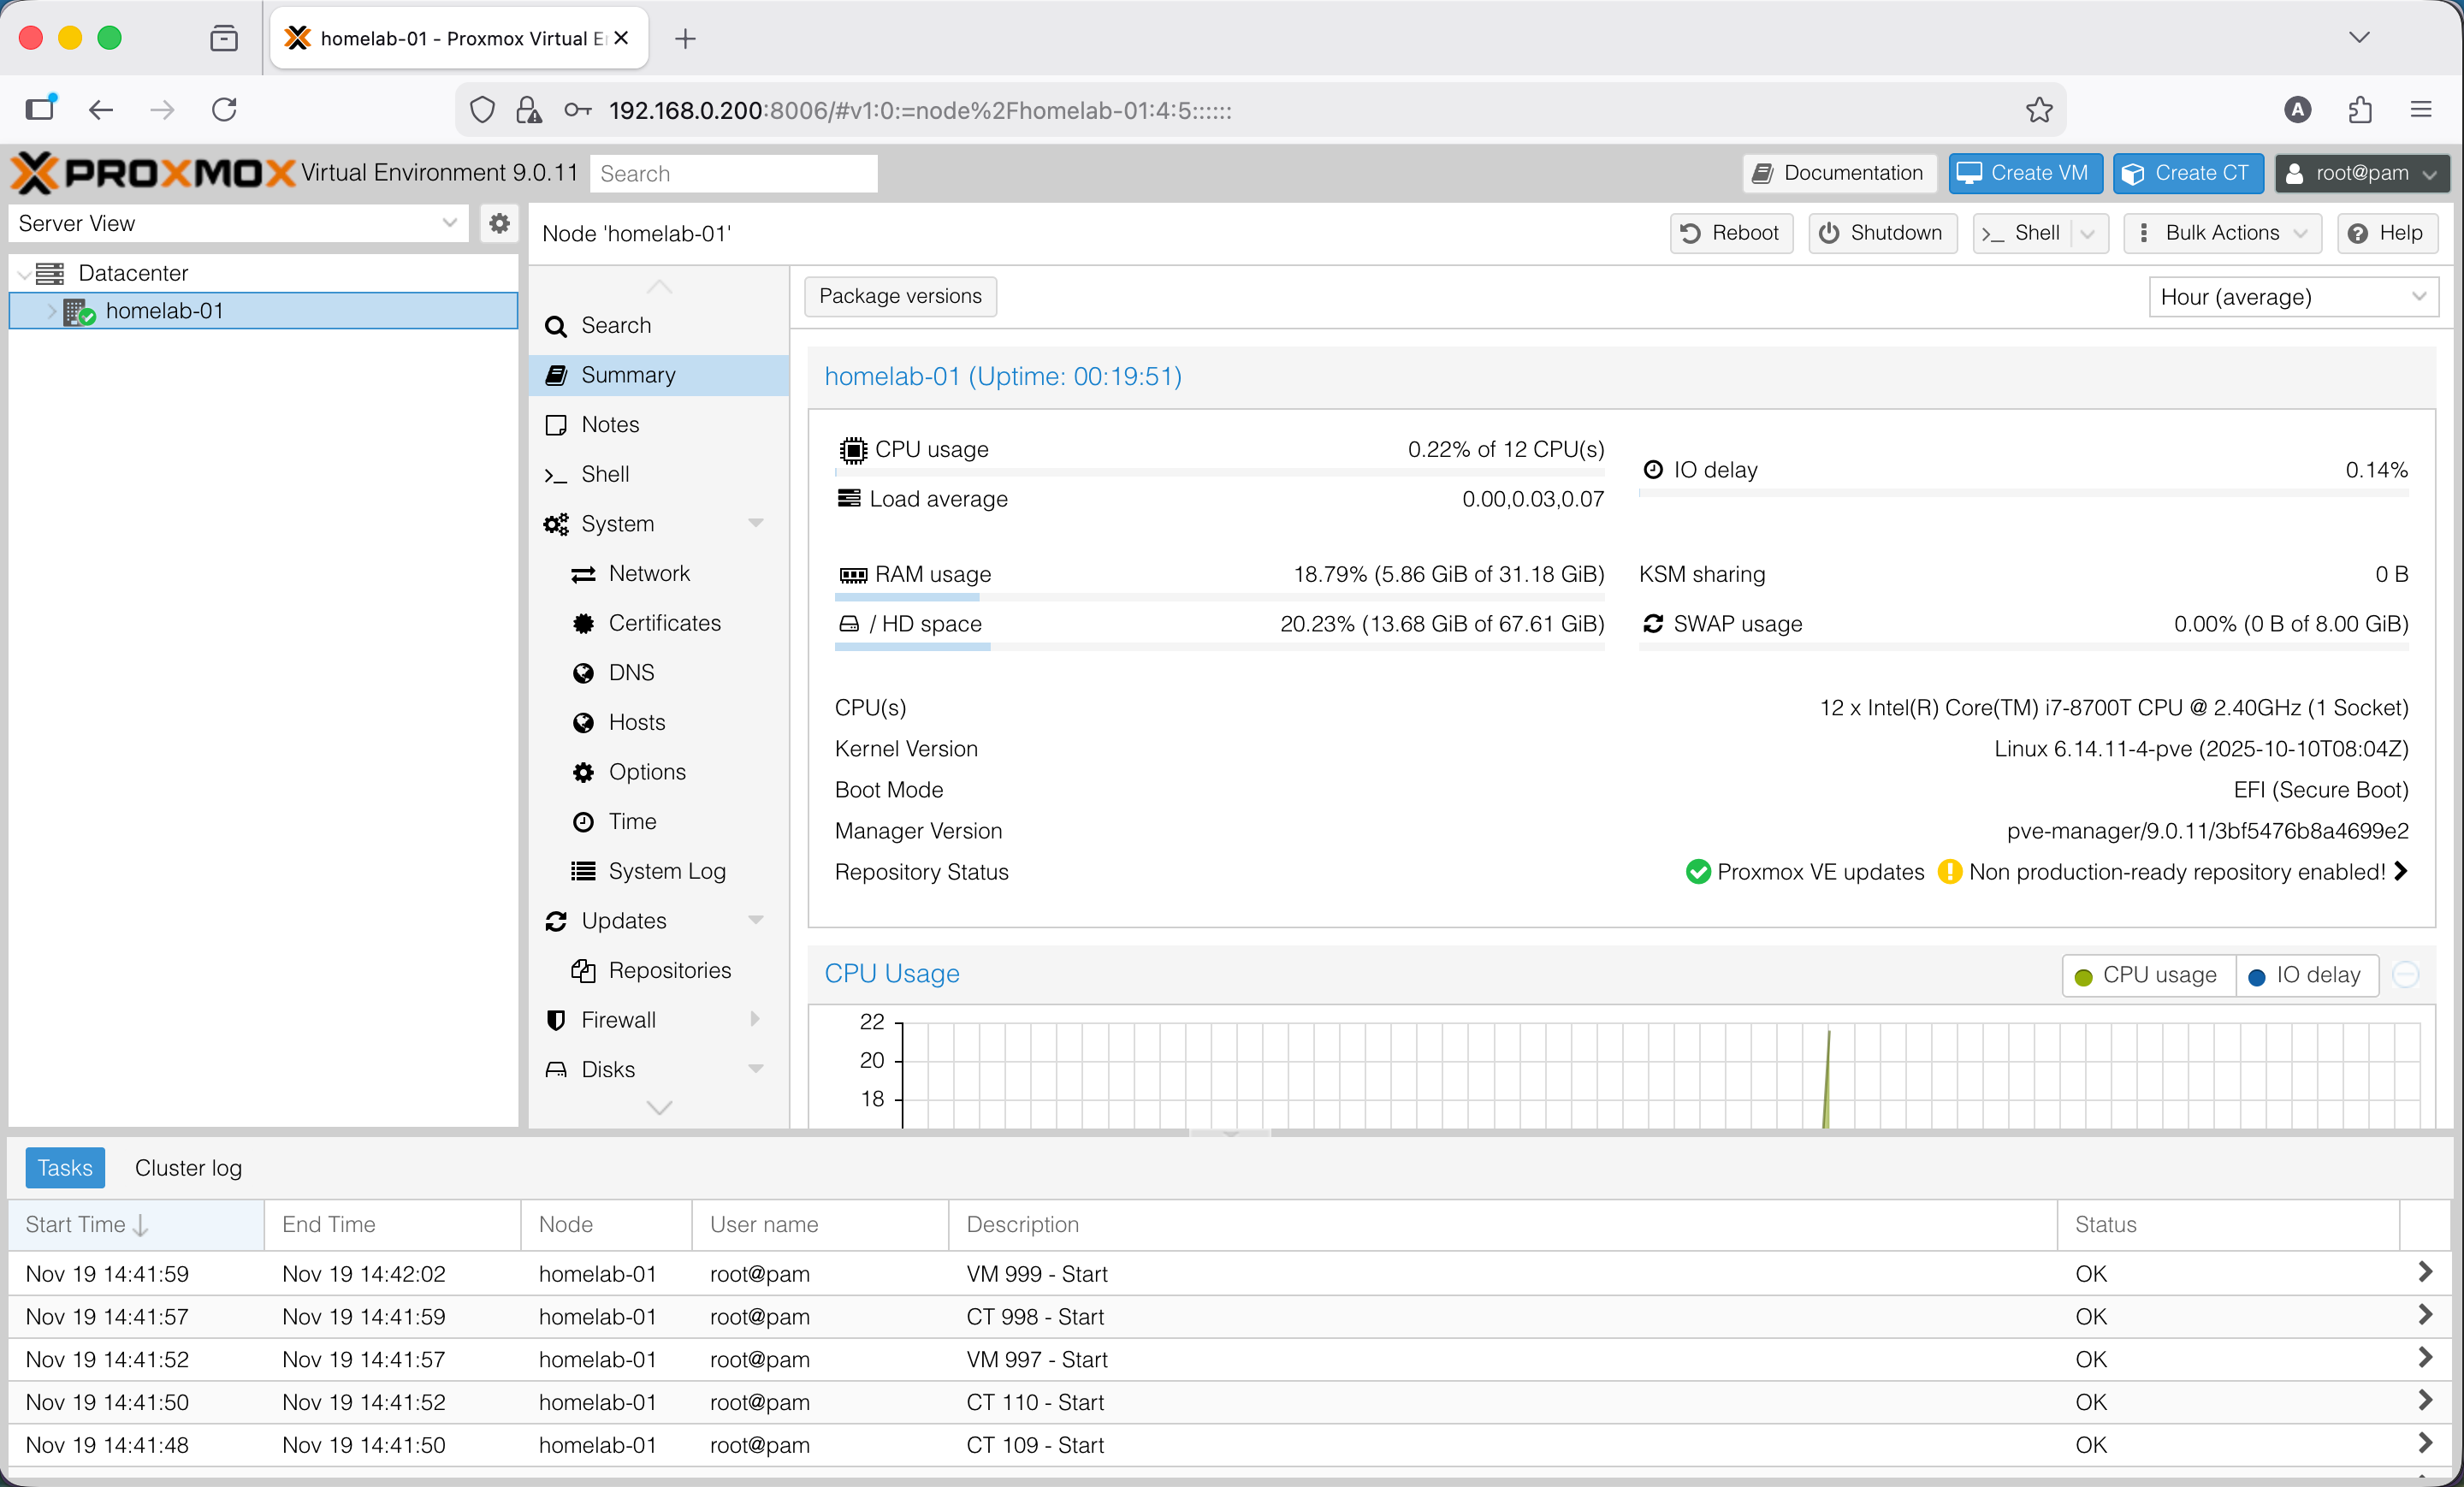
Proxmox web interface after installation
Testing Intel AMT / vPro
Now the most interesting part - testing Intel vPro. Before buying this mini PC, I hadn’t even heard of this technology, but seeing the sticker on the case with “Intel vPro” I decided to google it and ended up diving into this quite interesting topic. Interestingly, the specifications for this model and other similar models don’t mention vPro and AMT at all. I’m not sure that even in the companies where these PCs originally worked, anyone in IT knows about this functionality.
What is Intel AMT?
Intel AMT (Active Management Technology) is a technology from Intel, built into some processors and motherboards for computers. It allows IT specialists to remotely manage PCs: monitor status, update software, and power the machine on or off, even if the computer is off or the operating system won’t boot. This can be compared to IPMI on serious servers, but IPMI usually has its own separate network interface.
Enabling AMT in BIOS
Note: Exact menu paths may differ depending on BIOS version. Below are general steps for Lenovo ThinkCentre M920q.
- Enter BIOS (press F1 during boot)
- Go to Advanced → Intel(R) Manageability section

Enabling Intel AMT in BIOS
- Enable Intel Manageability Control: select “Enabled”

Additional AMT options in BIOS
- Optional: you can reset AMT configuration via Intel Manageability Reset (if AMT already has a password you don’t know)
- Save changes (F10) and reboot
- After reboot, to access MEBx (Management Engine BIOS Extension), you need to press Ctrl+P during boot
Disclaimer: Key combinations (F1, Ctrl+P) may differ on other PC models. For Dell it’s often F2, for HP - F10.
Configuring AMT
After successfully entering MEBx during computer boot, we can configure AMT. MEBx main menu on first entry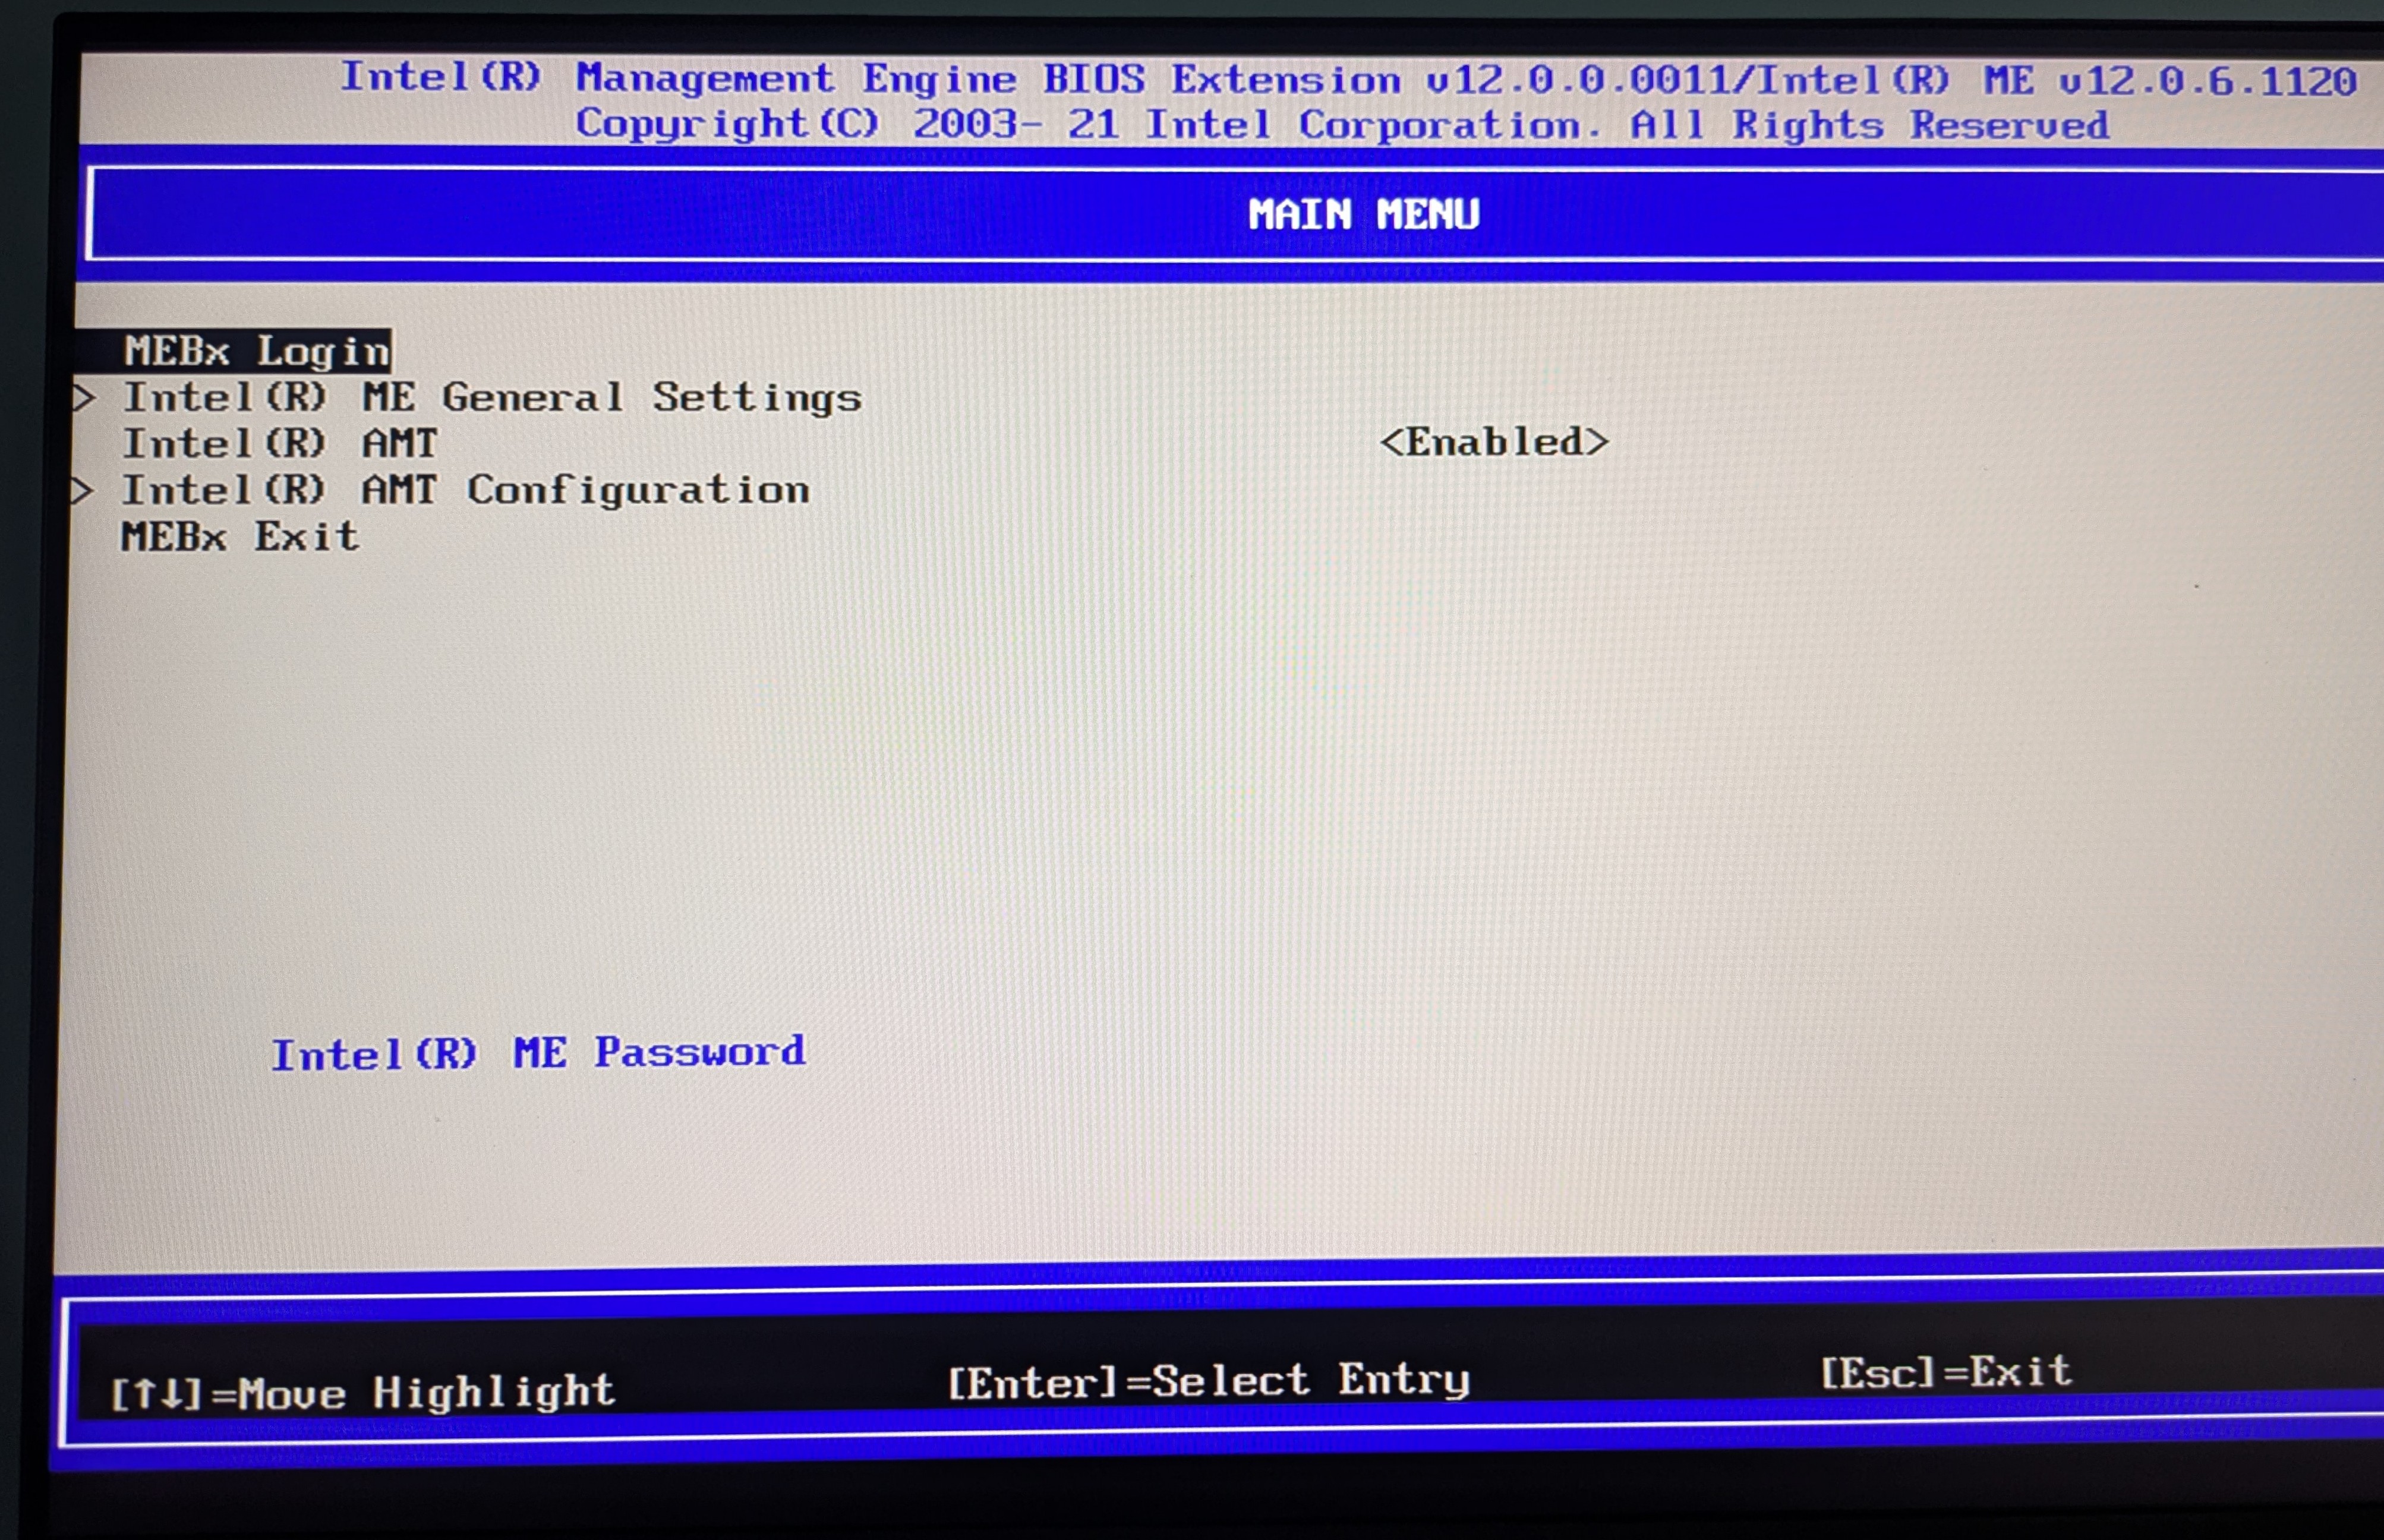
- Login: Use default credentials for first login
admin/admin - Password change: The system will immediately ask to set a new password
- Minimum 8 characters
- Must contain: numbers, lowercase and uppercase letters, special characters
- Example:
MyAmtPass123!
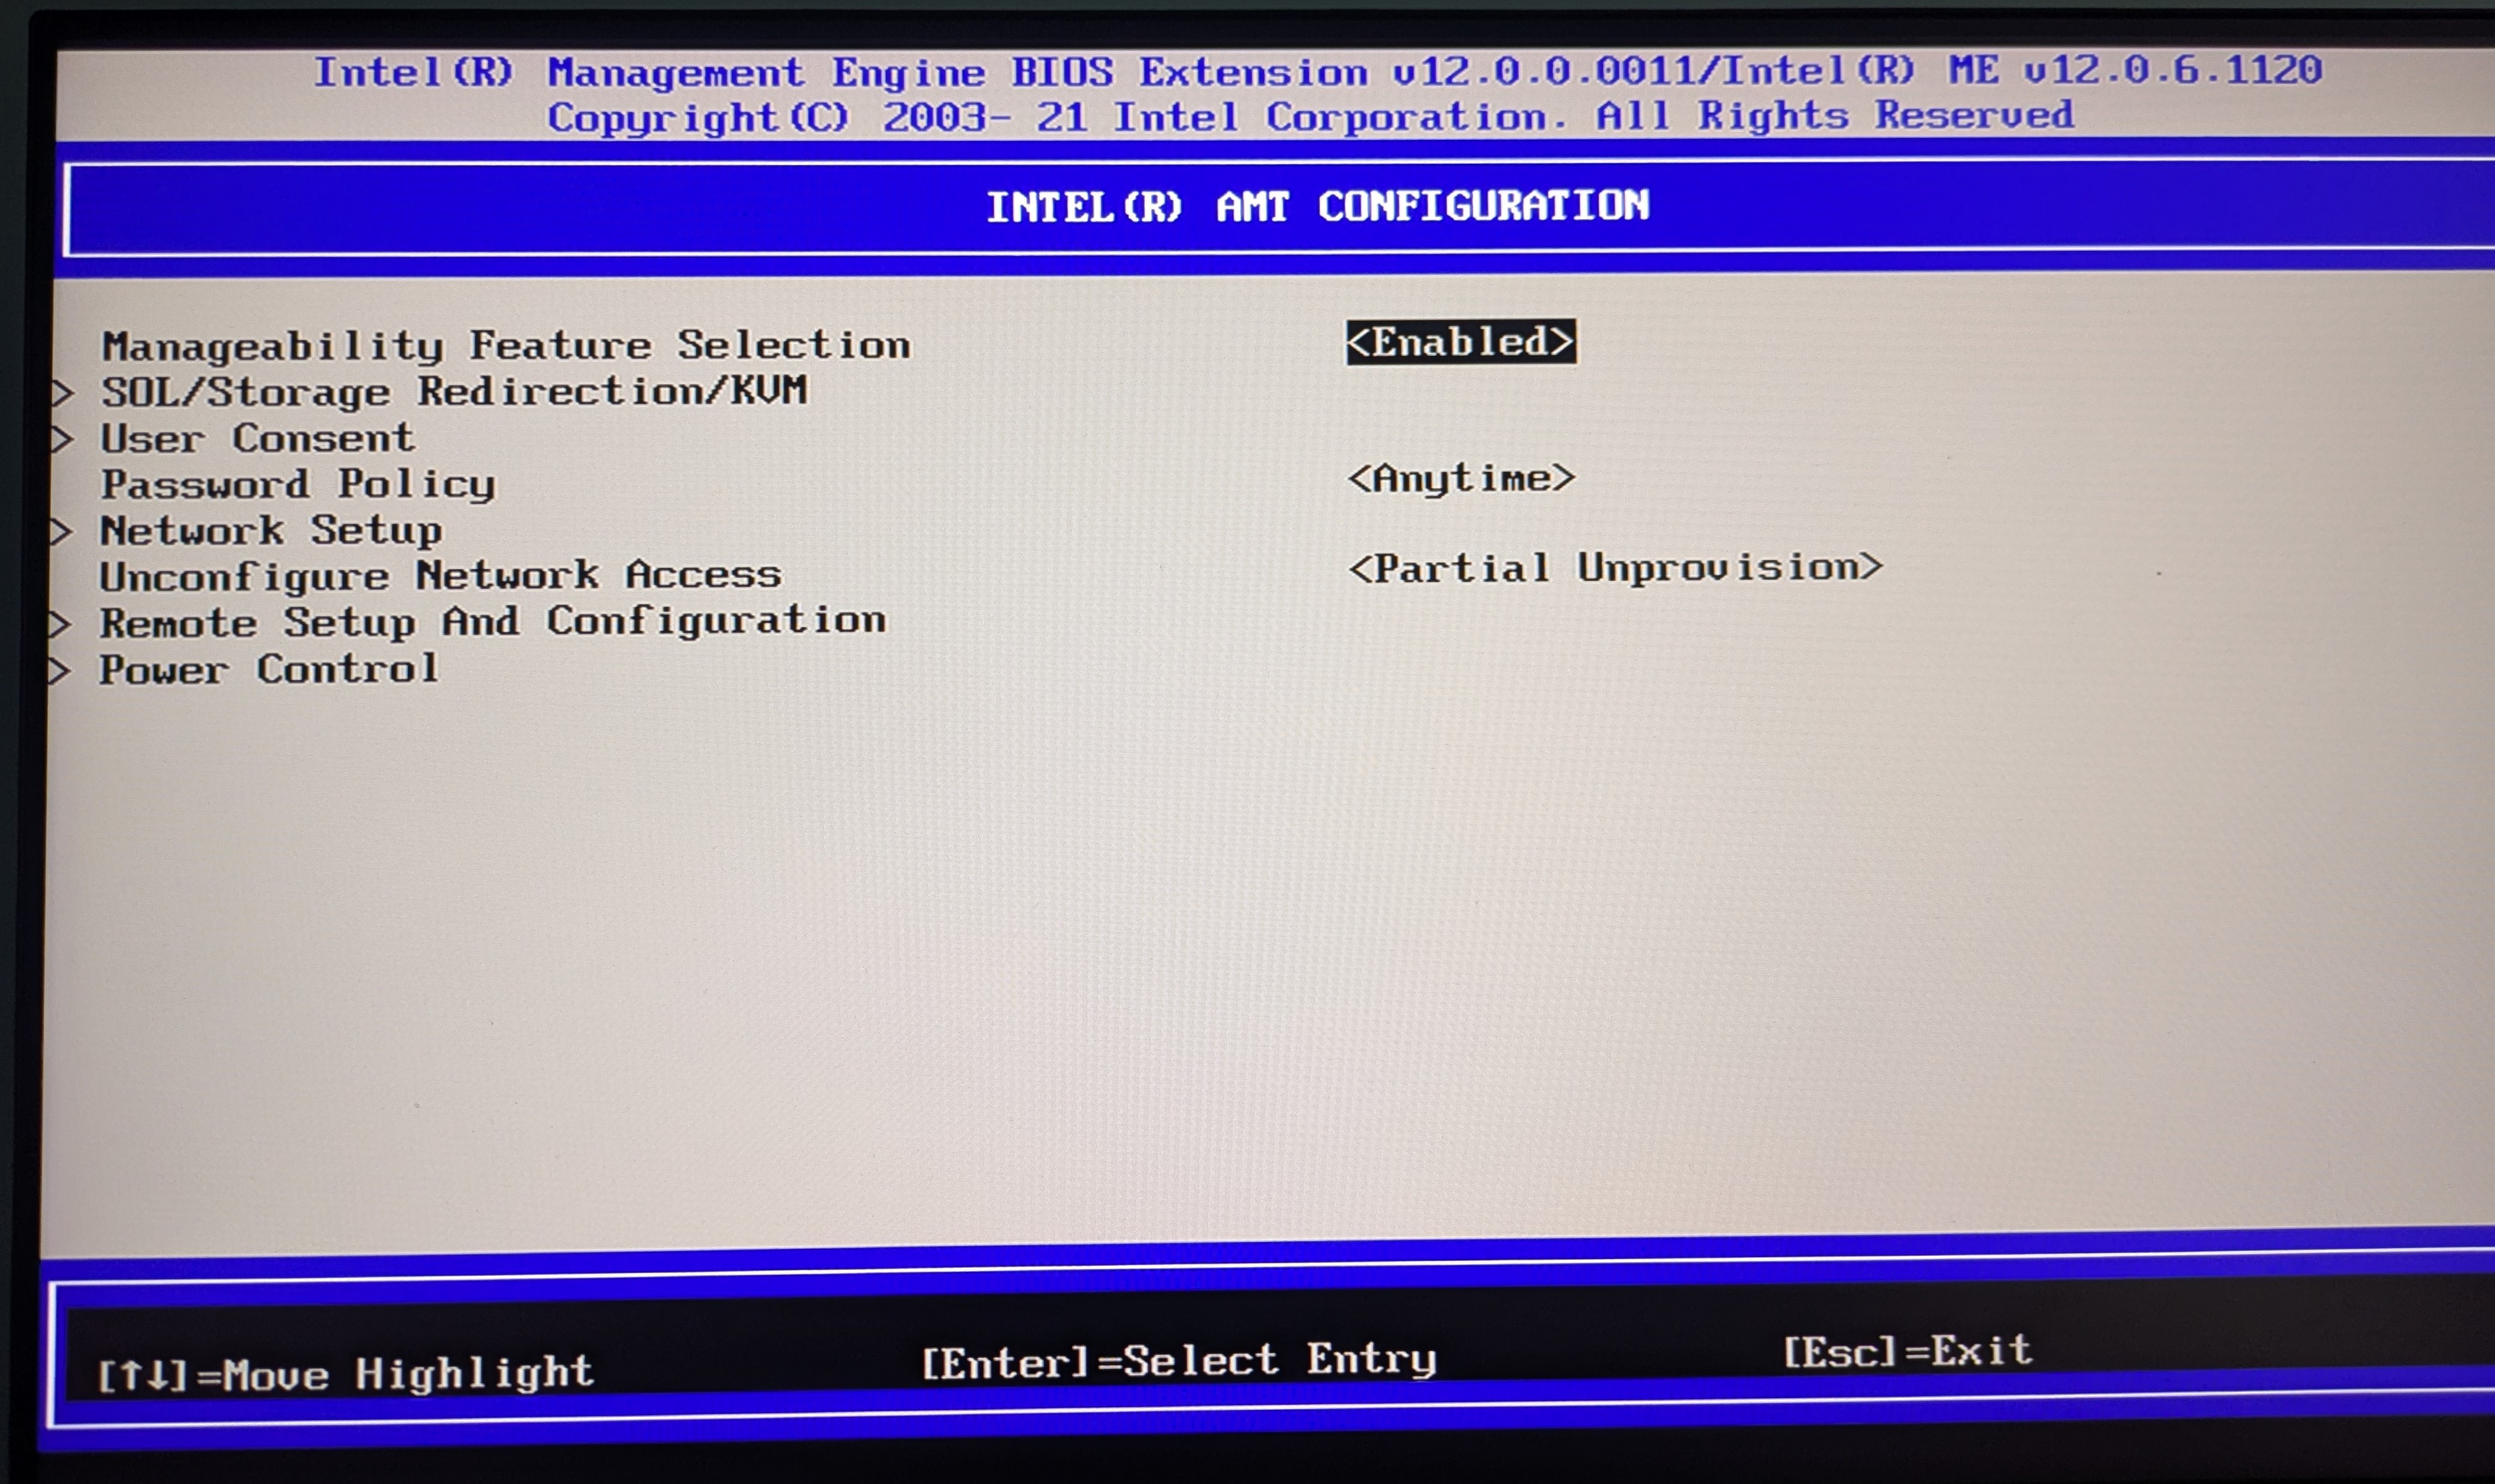
Configuring Intel AMT parameters in MEBx
- Network Setup: You can configure the IP address where the management interface will be accessible
- DHCP: Automatic IP assignment
- Static IP: If you need a static address, specify IP, mask, gateway
- Activate Network Access: Activate network access to AMT
- User Consent (user consent level):
- None — remote access without confirmation (convenient for home use when the computer sits without monitor and peripherals)
- KVM only — consent required only for KVM sessions
- All — confirmation required for all operations (safer for corporate environment)
- Saving: Exit MEBx with saving (ESC → Yes)
Important! - Intel AMT Security:
Intel AMT is a powerful but potentially dangerous tool. It operates below the operating system level and is accessible even when the computer is off (if power and network are connected).
What you must do:
- Use a strong password
- Never expose AMT port (16992) directly to the internet
Why this matters: If someone gains access to AMT, they can fully control the computer: see the screen, control the system, mount ISO images, even when the OS is off. It’s like physical access to the computer, but over the network.
For a home network behind NAT this is usually safe, but be careful when setting up remote access.
Testing Remote Access
After enabling AMT, I found its DHCP IP address using nmap network scan.
You can open the web interface by going to http://<amt_ip>:16992 in a browser.
Log in with user admin and the password we set, and we end up in this interface:
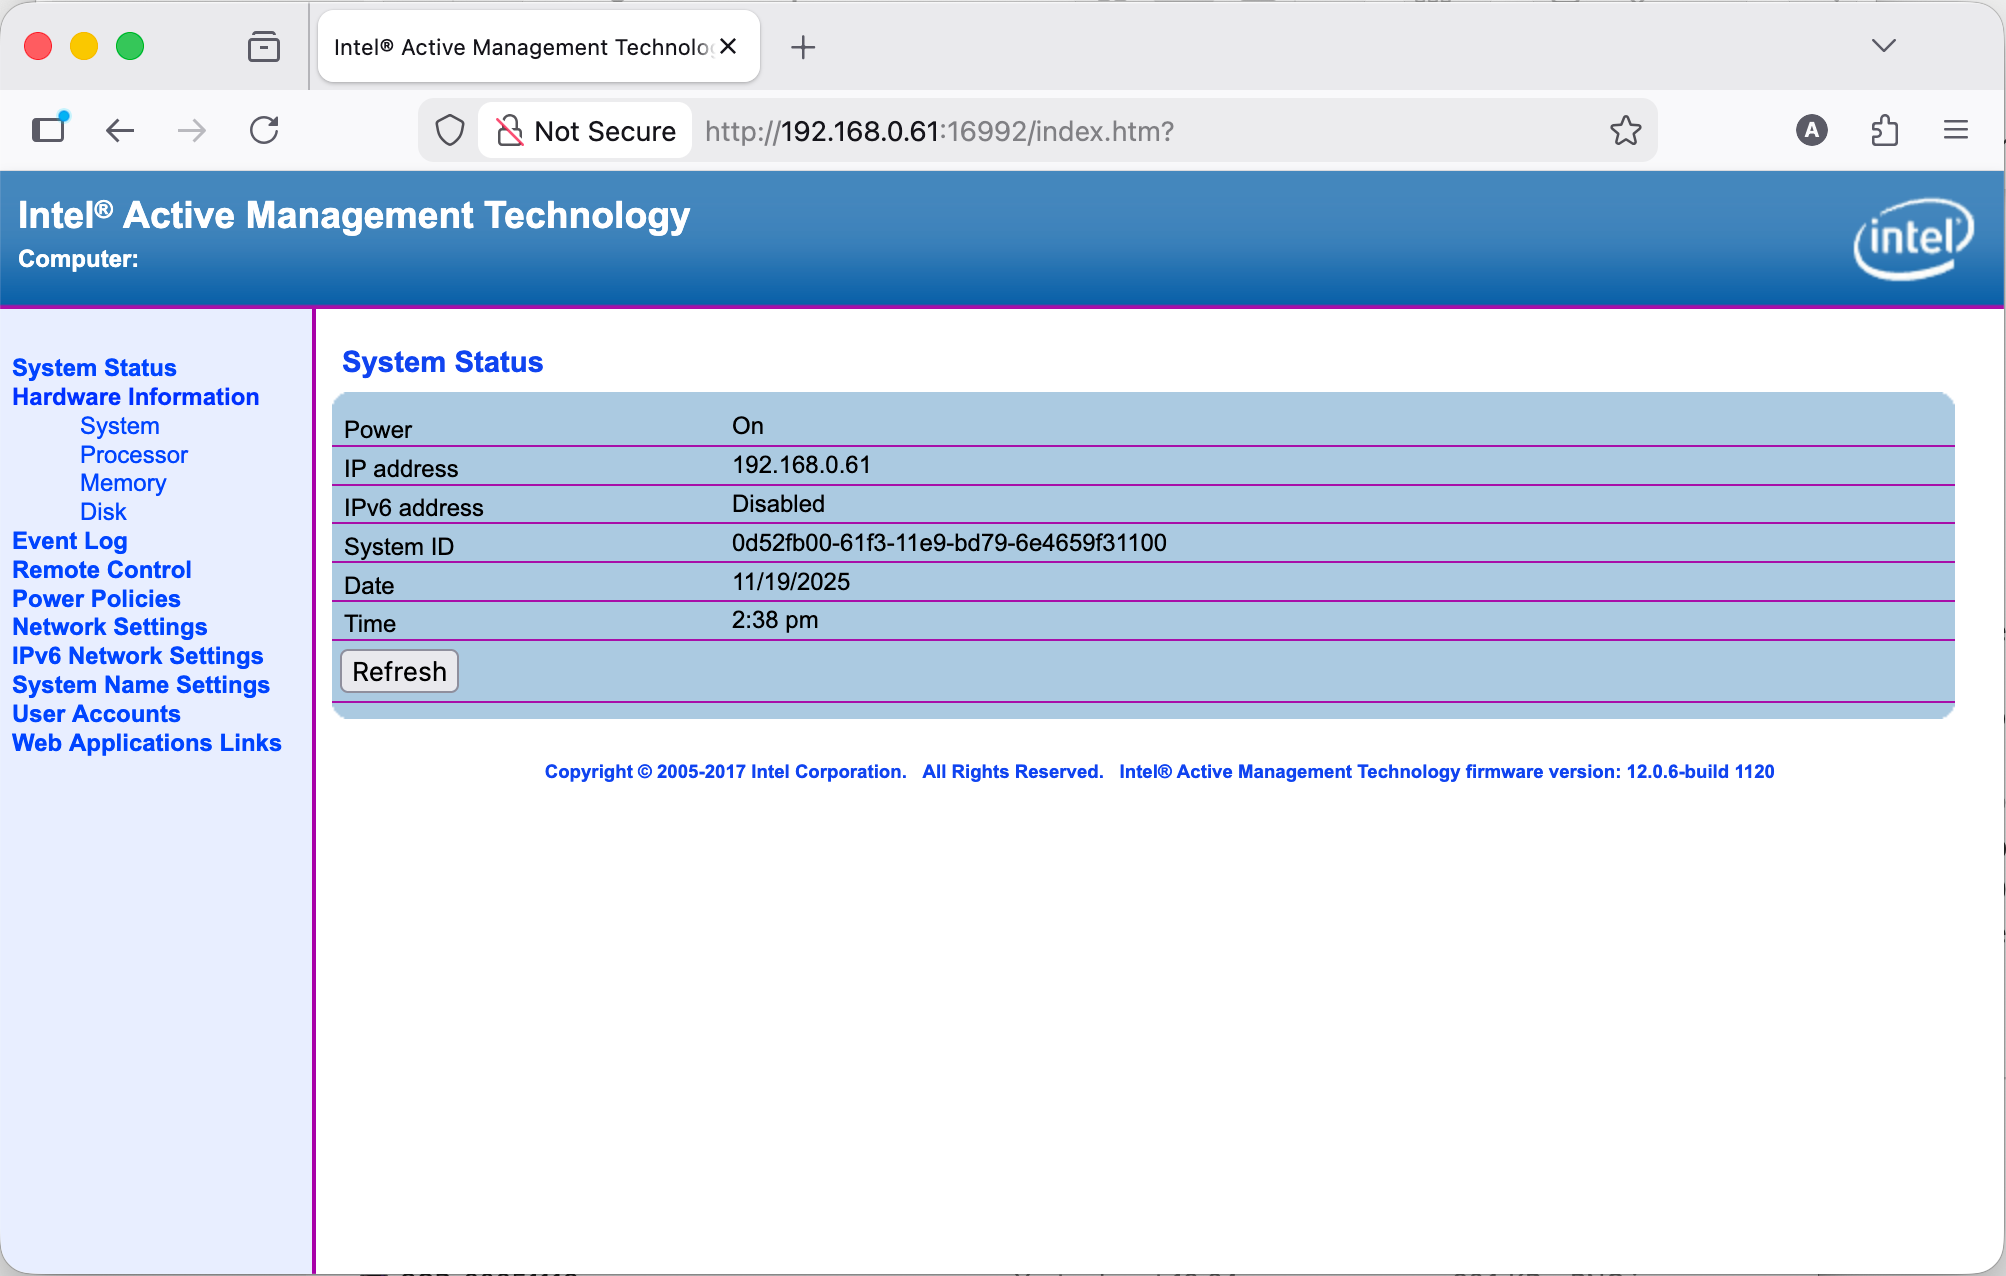
Intel AMT web interface - main page with system information
Here you can see some general system data. You can view more detailed hardware information (processor, RAM modules, disk).
The most important thing here is in the Remote Control tab:
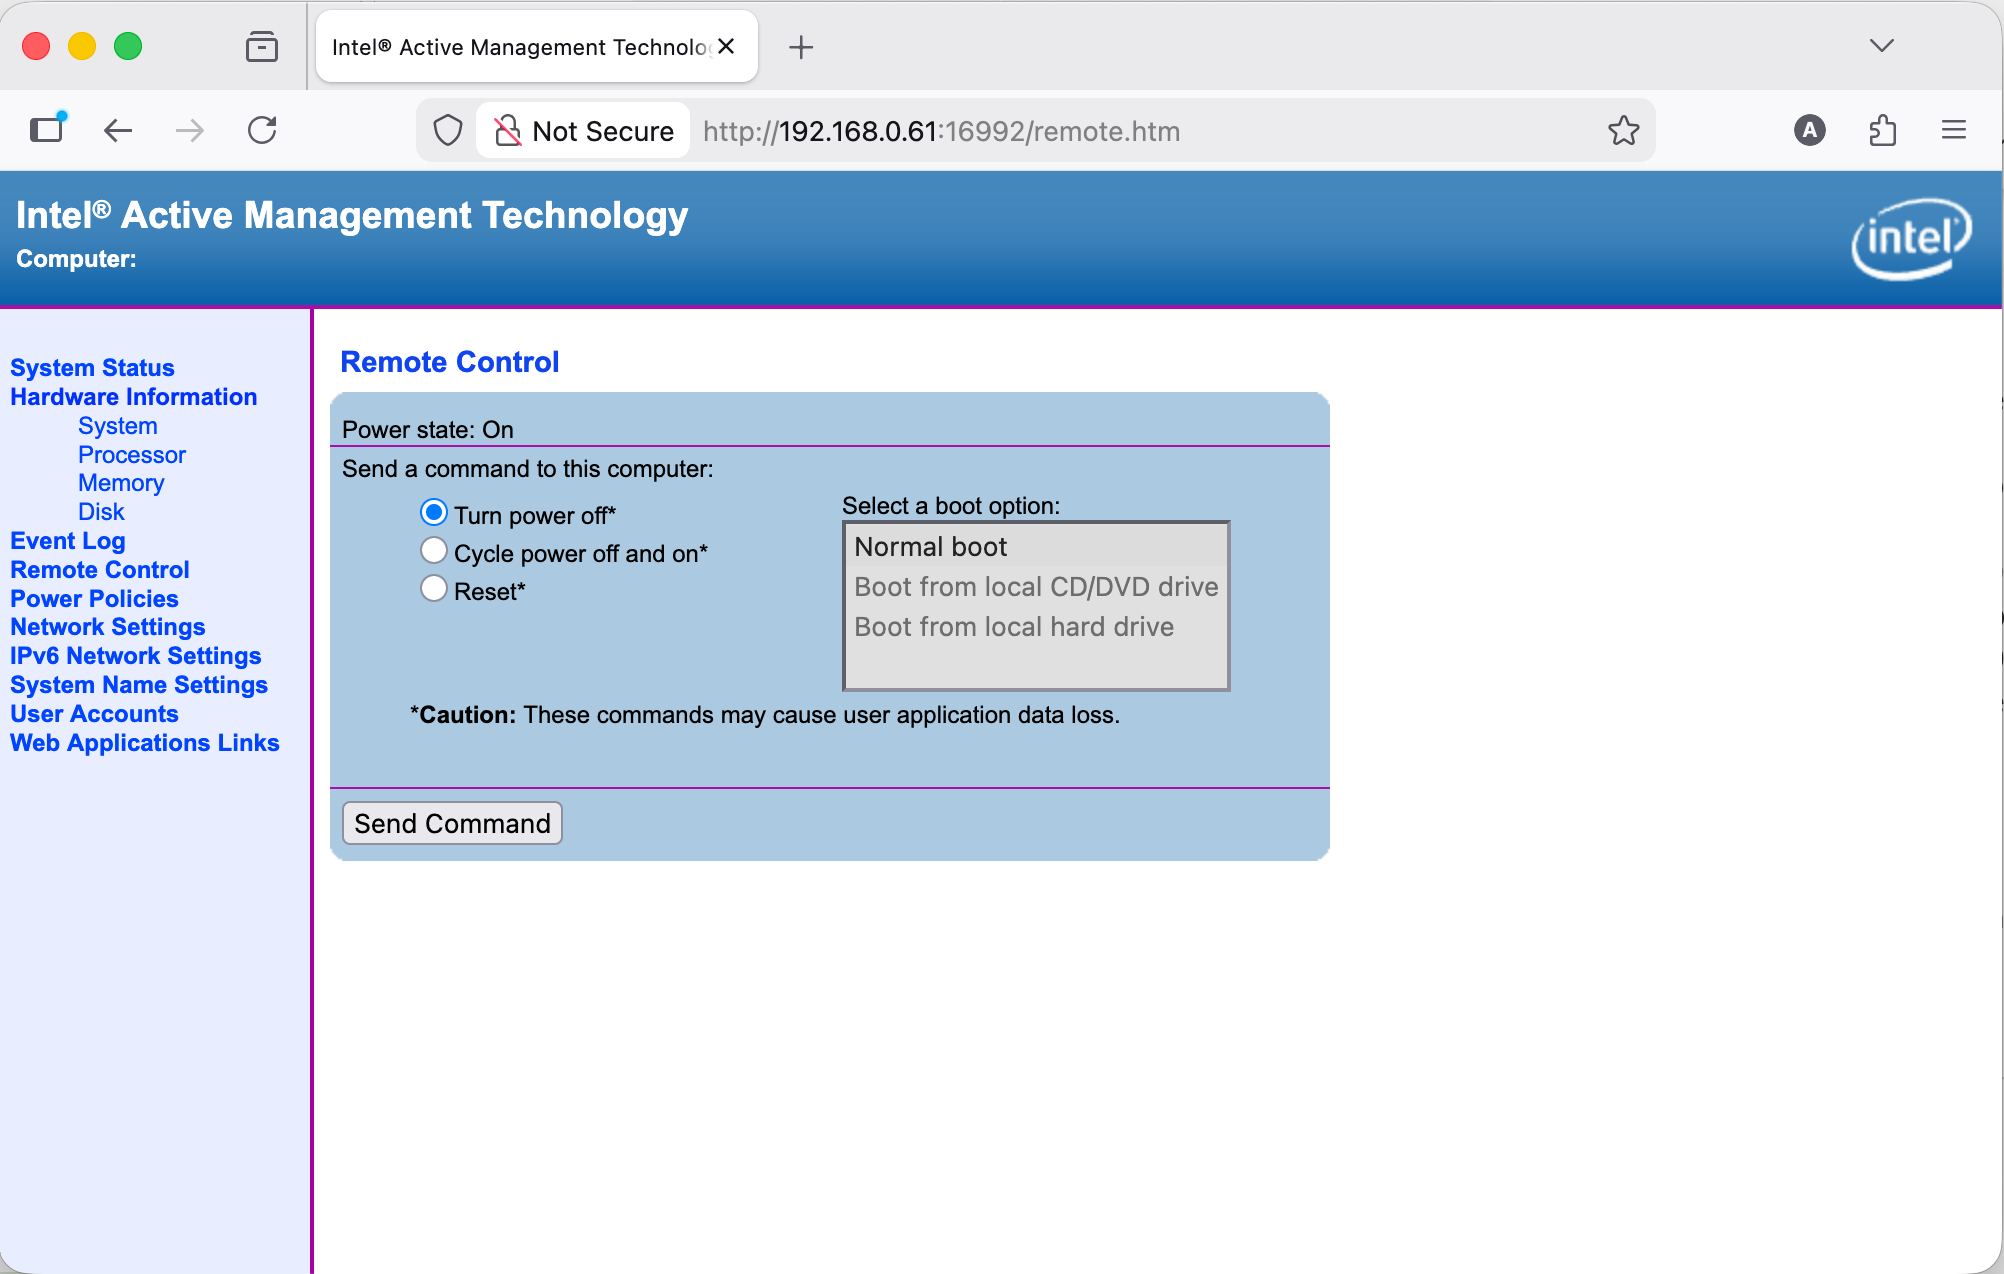
Power management through AMT web interface
We can turn on/off/reboot. But… how do we connect to the computer remotely with display, keyboard and mouse?
In this interface - not possible, you need separate software for that. The choice for this is not very big. On macOS, the only thing I can use is MeshCommander. (While searching for options, I found a guide for connecting from Linux, but I haven’t tested whether it works - https://www.cyberciti.biz/faq/remotely-access-intel-amt-kvm-linux-desktop/)
MeshCommander
MeshCommander — This is open source software for managing computers with Intel AMT. It’s a cross-platform solution written entirely in JavaScript that works on Windows, Linux and macOS. On Windows it’s easiest to install because there’s a simple installer. But for other OSes you need to run a local web server through Node.js.
I used the following method on macOS:
- Created a directory and changed into it
mkdir meshcommander && cd meshcommander - Downloaded the meshcommander package from NPM
npm install meshcommander - Ran it with node:
node node_modules/meshcommander - After that you can go to
http://127.0.0.1:3000in a browser
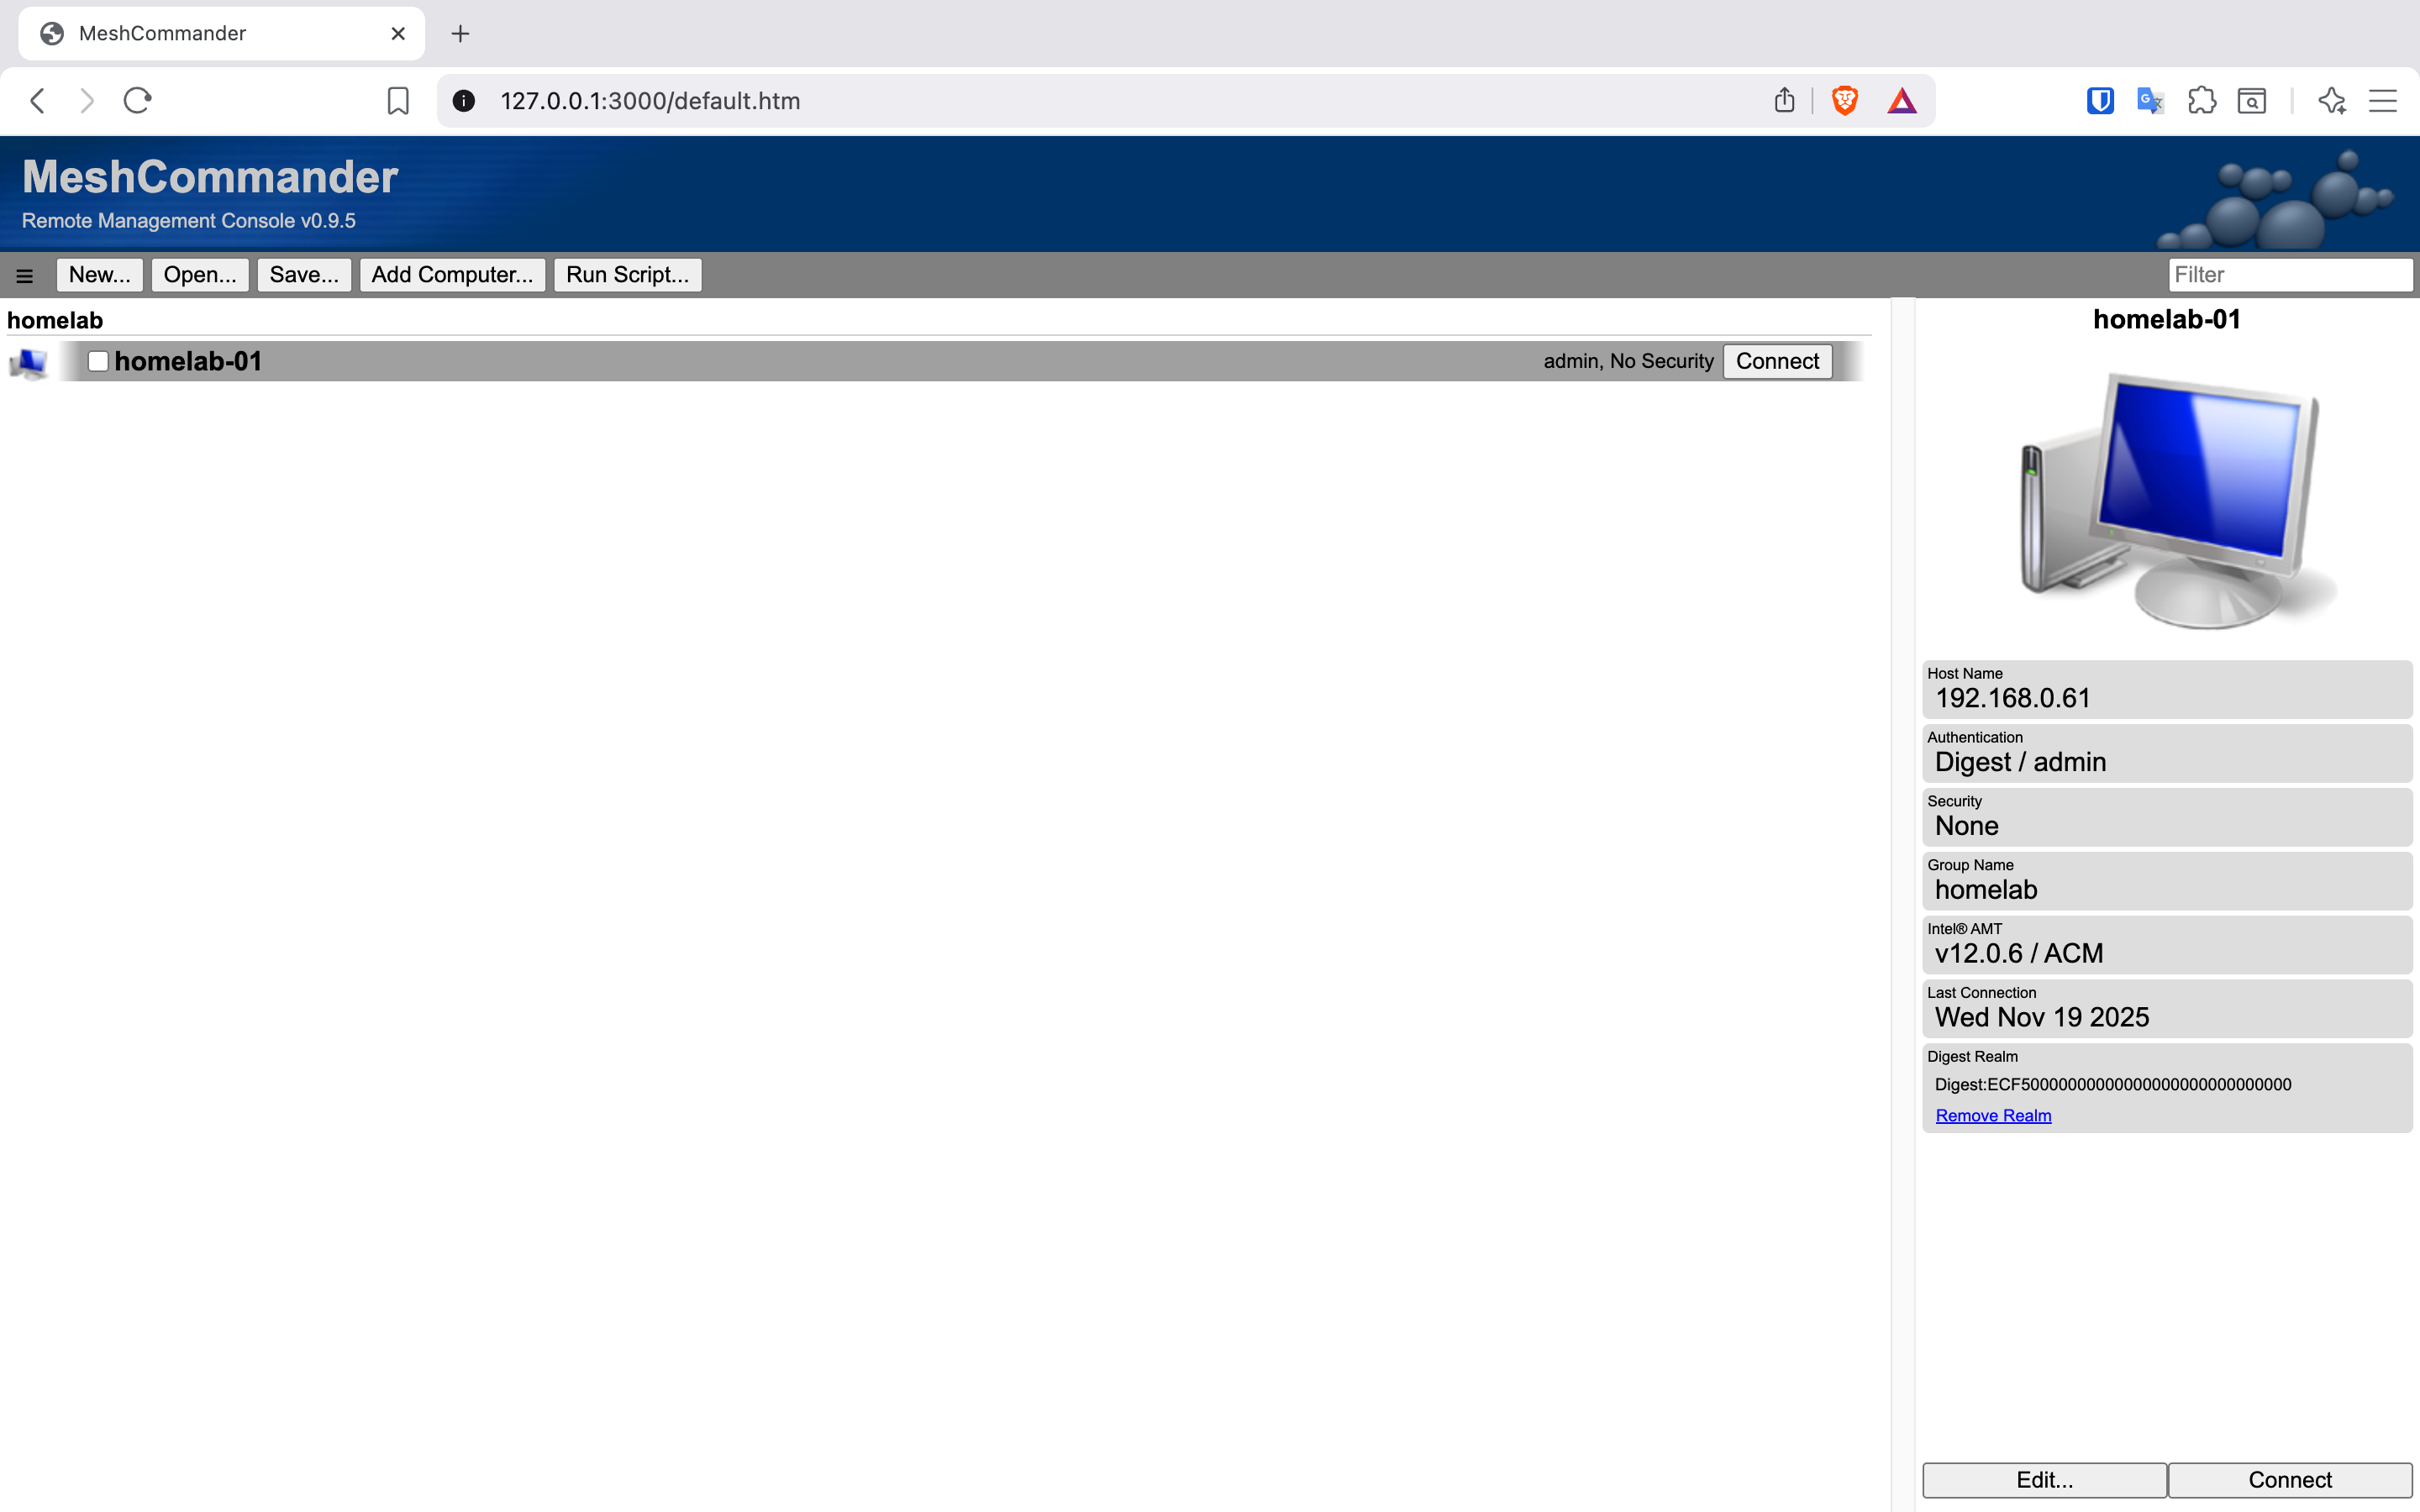
MeshCommander interface
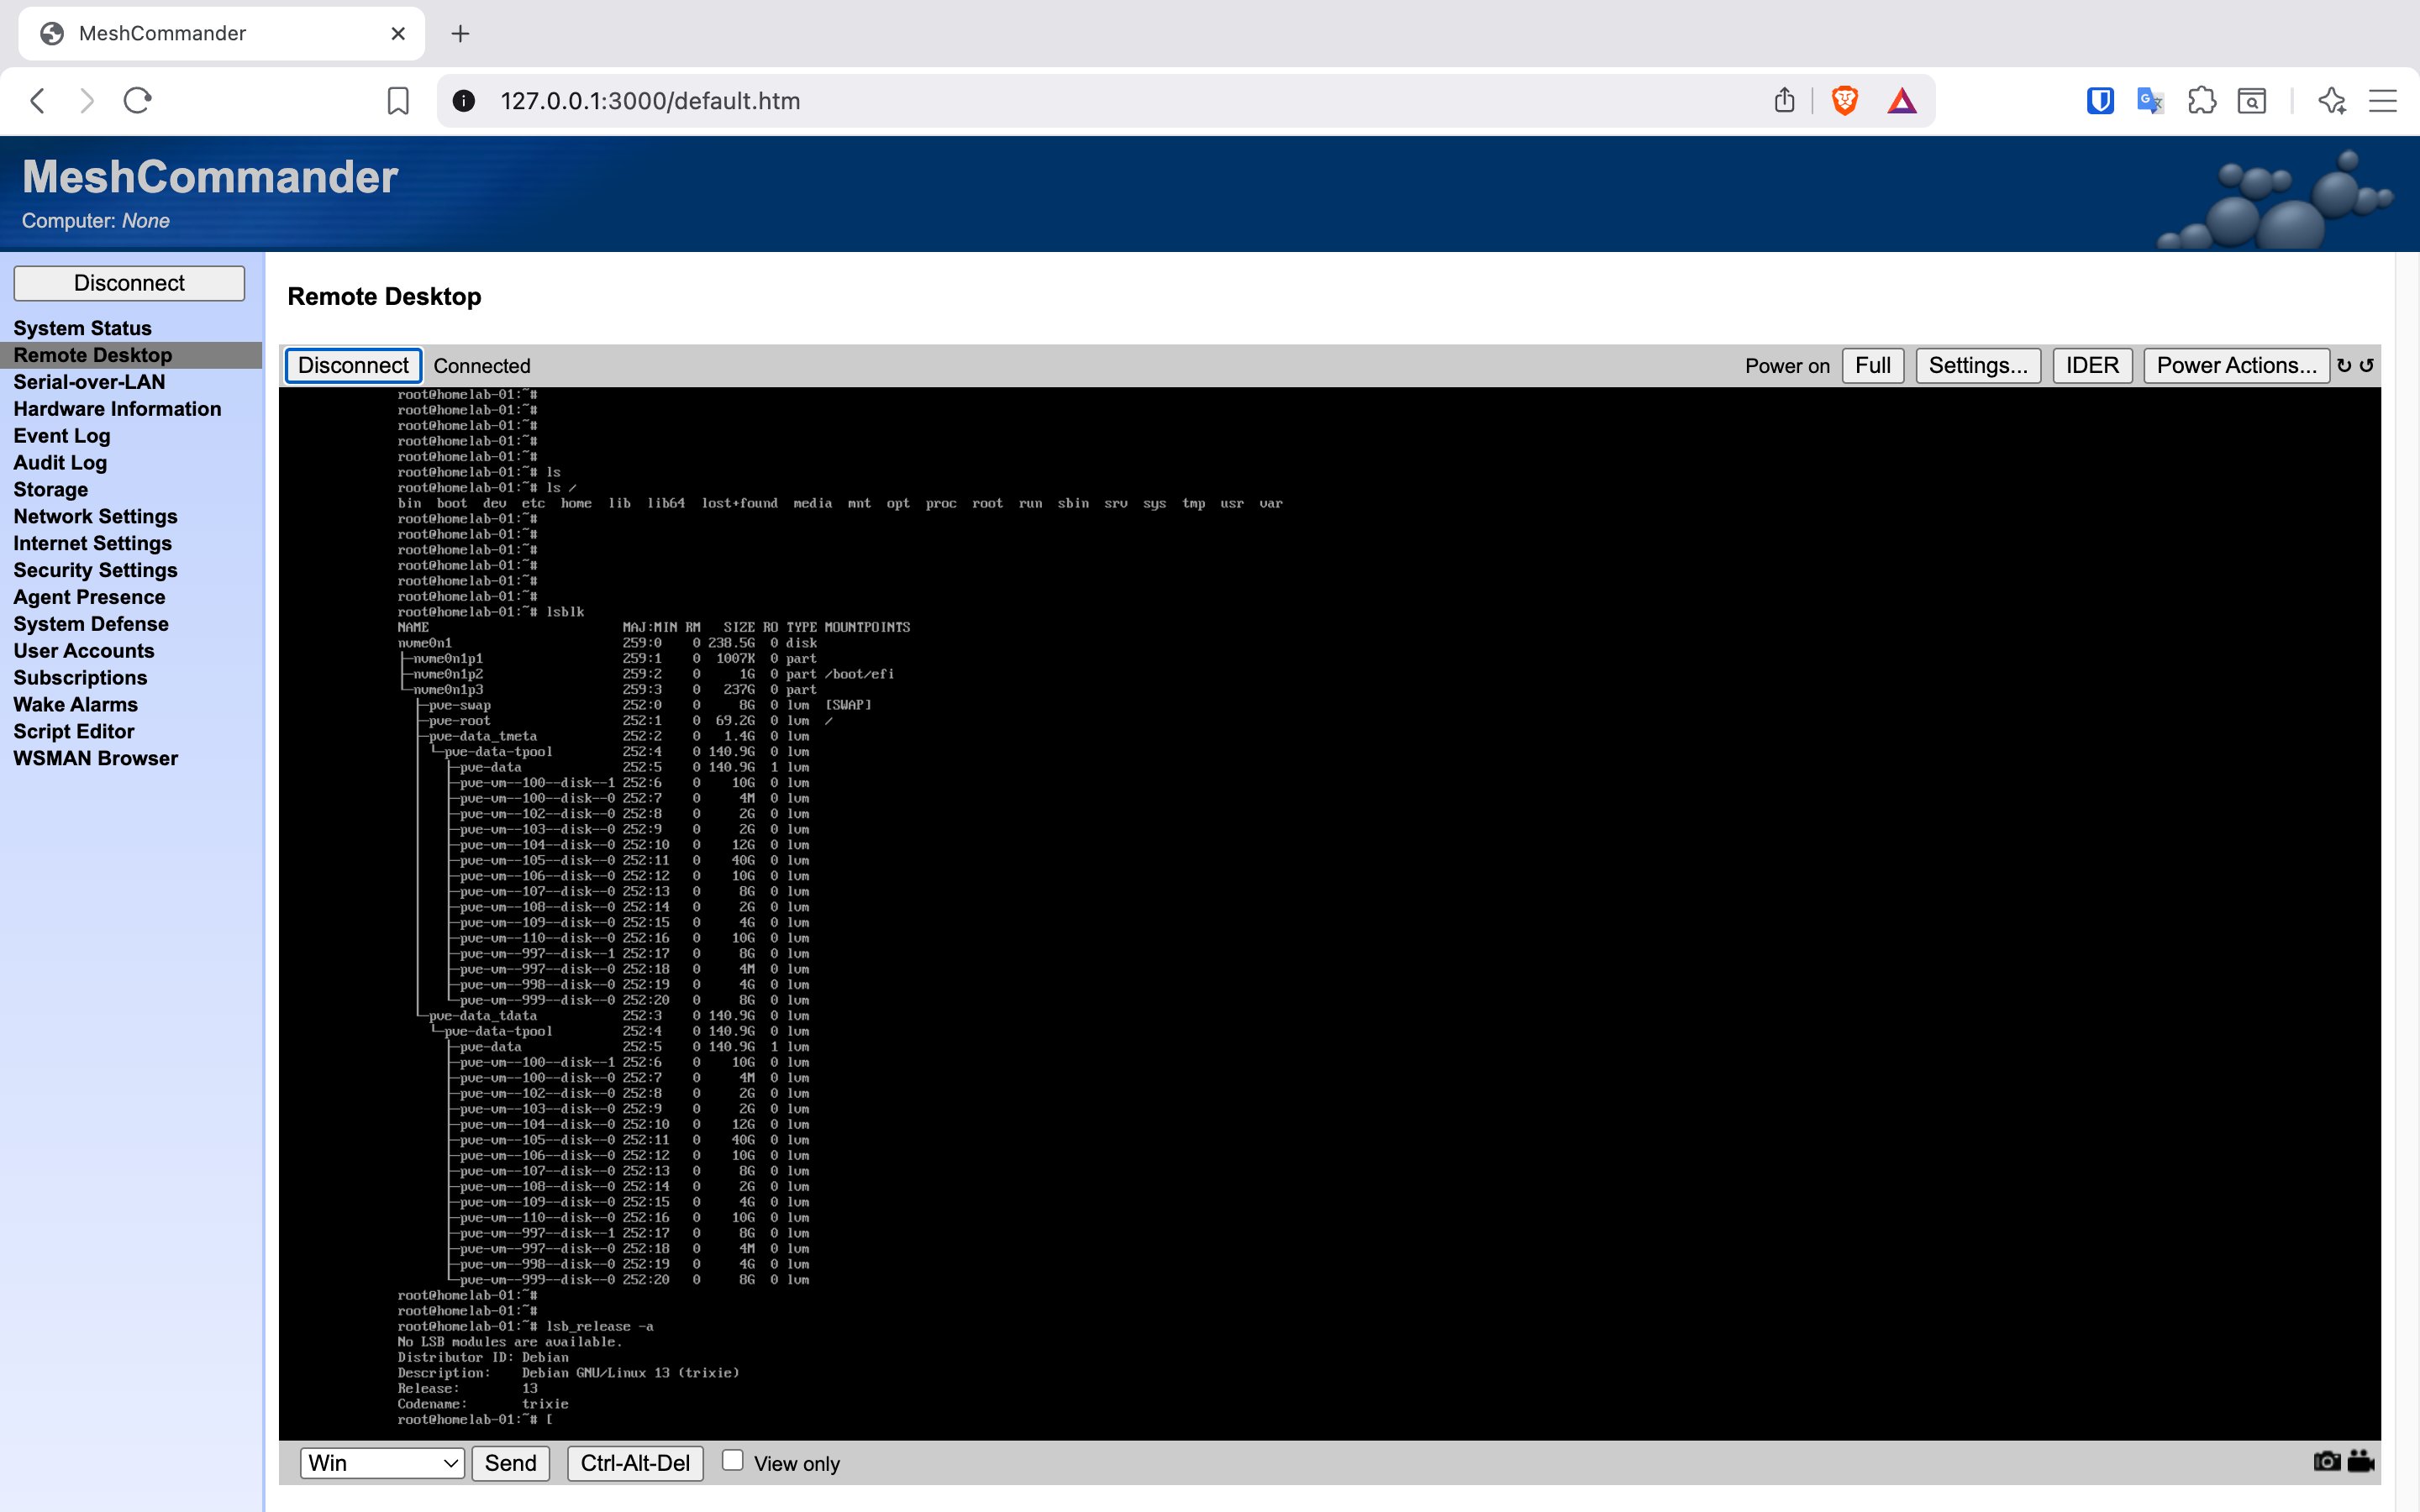
Example of connecting to host for remote control
Capabilities
With MeshCommander you can do much more than just with the AMT web interface on the device itself:
- KVM (Keyboard, Video, Mouse) - remote access to screen, keyboard and mouse through browser
- Serial-over-LAN - console access over network
- IDER (IDE Redirection) - mounting ISO images remotely
Important: KVM only works with Intel integrated graphics. If a discrete graphics card is used or if the monitor is disconnected without an HDMI dummy plug, the image may be unavailable.
In the future I plan to get myself such an HDMI dummy plug, but for now remote power on/off is enough for me.
Conclusion
I’m very glad that unlike my previous attempts at setting up my home lab, this time I managed to get past the server search stage. I was very surprised that I actually found the perfect option for myself - small, quiet and not very expensive. My feelings about using Intel AMT are quite mixed. On one hand it’s amazing that a simple PC has such remote management capabilities, but on the other hand there’s a complete lack of documentation and strange proprietary protocols that require special software.
What’s next?
In the next part, I’ll tell you how I configured Proxmox after initial installation, how I deployed virtual machines and LXC containers with services. I’ll show how to deploy and configure Cloudflare Tunnel for accessing services from the internet without needing a public IP or port forwarding, as well as a simple and flexible VPN solution.